
In the dynamic digital landscape, the ability to proficiently screen record on your Mac is a valuable skill. Whether you’re a content creator, educator, or business professional, the process of capturing and sharing your screen can significantly enhance the way you communicate and engage with your audience. In this comprehensive guide, we will delve into the intricacies of screen recording on your Mac, covering everything from the fundamental steps to advanced techniques. Join us on this journey to unlock the full potential of your screen recording endeavors, with the focus keyword being your guiding companion throughout the exploration. Let’s dive in and elevate your screen recording game!
Table of Contents
Why Screen Record on Mac?
Screen recording on your Mac is a powerful tool that opens up a world of possibilities for both personal and professional use. Whether you’re a content creator, educator, or simply someone who wants to share your knowledge, understanding why screen recording is beneficial can enhance your overall computing experience.
1. Tutorials and How-To Guides:
One of the primary reasons to screen record on your Mac is to create tutorials or how-to guides. Whether you’re demonstrating software functionality, guiding users through a process, or showcasing a specific skill, screen recording allows you to capture every detail on your screen. This is particularly useful for those who prefer visual learning.
2. Efficient Communication:
Screen recording is an effective way to communicate complex information or troubleshoot issues. Instead of describing steps in text or through a phone call, you can visually show the process. This is invaluable for remote collaboration, allowing you to share your screen with colleagues or clients, enhancing clarity and reducing misunderstandings.
3. Content Creation for Social Media:
If you’re active on social media platforms, screen recording can elevate your content. Whether it’s a quick demo, a gaming highlight, or a software review, visually engaging content tends to capture more attention. Screen recording enables you to share your experiences and expertise in a format that resonates with your audience.
4. Educational Purposes:
For educators, screen recording can be a game-changer. Create engaging lessons, explain complex topics, or provide feedback on assignments by recording your screen. Students can benefit from visual learning, and the ability to revisit recorded lessons enhances the overall learning experience.
5. Capturing Moments in Apps and Games:
Gamers and app enthusiasts can use screen recording to capture memorable moments, glitches, or achievements. Share your gameplay, review apps, or create walkthroughs to connect with a wider community. This is an excellent way to participate in the gaming or app development ecosystem.
6. Preserving Webinars and Online Presentations:
For professionals attending webinars or online presentations, screen recording ensures that you don’t miss important information. Capture the entire presentation, review it later, or share key insights with your team. It’s a convenient way to archive valuable content for future reference.
Built-in Screen Recording Features on Mac
If you’re a Mac user, you’re in luck! Apple’s macOS comes equipped with a built-in screen recording feature that is both robust and user-friendly. Understanding how to leverage these native tools can save you the trouble of downloading third-party software. Let’s dive into the core built-in options for screen recording on your Mac.
1. QuickTime Player:
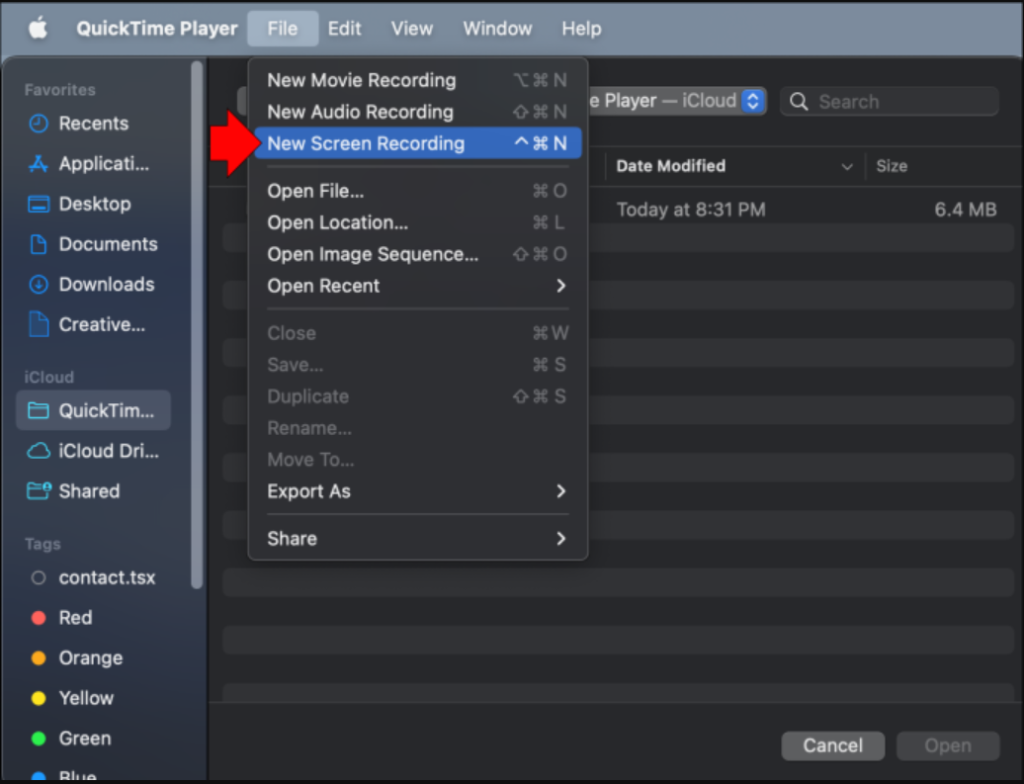
The star of the show when it comes to built-in screen recording on Mac is QuickTime Player. This versatile media player isn’t just for watching videos; it also serves as a reliable screen recorder. To get started, open QuickTime Player and navigate to “File” in the menu bar. Select “New Screen Recording” and a control panel will appear, allowing you to choose your recording settings.
2. Selecting Recording Area:
QuickTime Player enables you to choose the specific area of your screen you want to record. This flexibility is handy when you only need to capture a portion of your display. Simply click the red recording button, drag to select your desired area, and hit “Start Recording.”
3. Audio Recording Options:
Including audio in your screen recording is crucial for tutorials or presentations. QuickTime Player allows you to record your computer’s audio or use an external microphone. Ensure your audio settings are configured correctly in the control panel before initiating the recording.
4. Screen Recording Controls:
While recording, a small control panel will be visible. It includes options to stop the recording, mute audio, or cancel the process altogether. Familiarize yourself with these controls to have a seamless recording experience.
5. Saving Your Recording:
Once you’ve completed your screen recording, click the stop button in the menu bar or the control panel. QuickTime Player will automatically open the recorded file. From there, you can save it to your desired location on your Mac.
Choosing the Right Software
While Macs come equipped with a handy built-in screen recording feature, you may find yourself needing more advanced functionalities or additional features. This is where third-party screen recording software comes into play. Choosing the right software tailored to your specific needs can significantly enhance your recording experience.
1. Consider Your Requirements:
Before diving into the sea of available screen recording software, outline your specific requirements. Do you need advanced editing capabilities, live streaming features, or a user-friendly interface? Understanding your needs will help narrow down the options.
2. Popular Screen Recording Software:
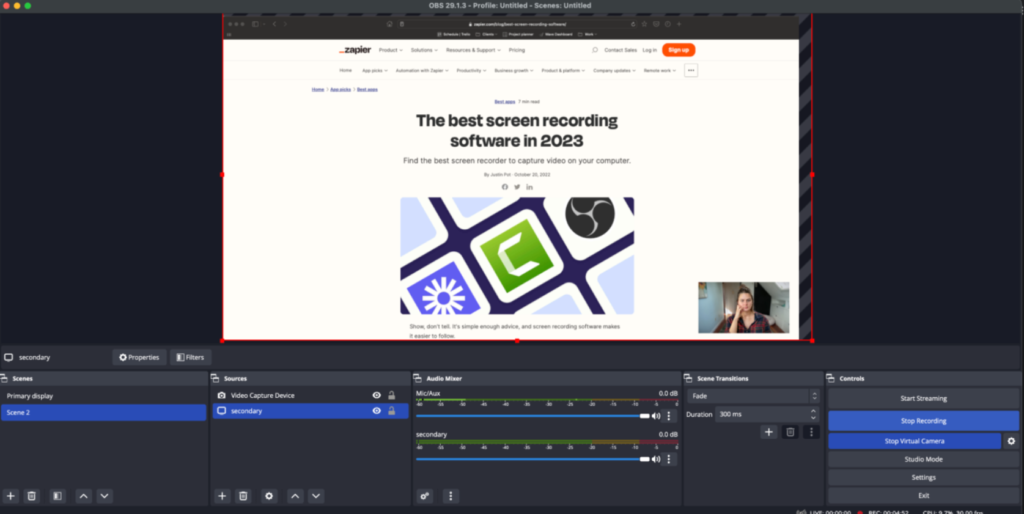
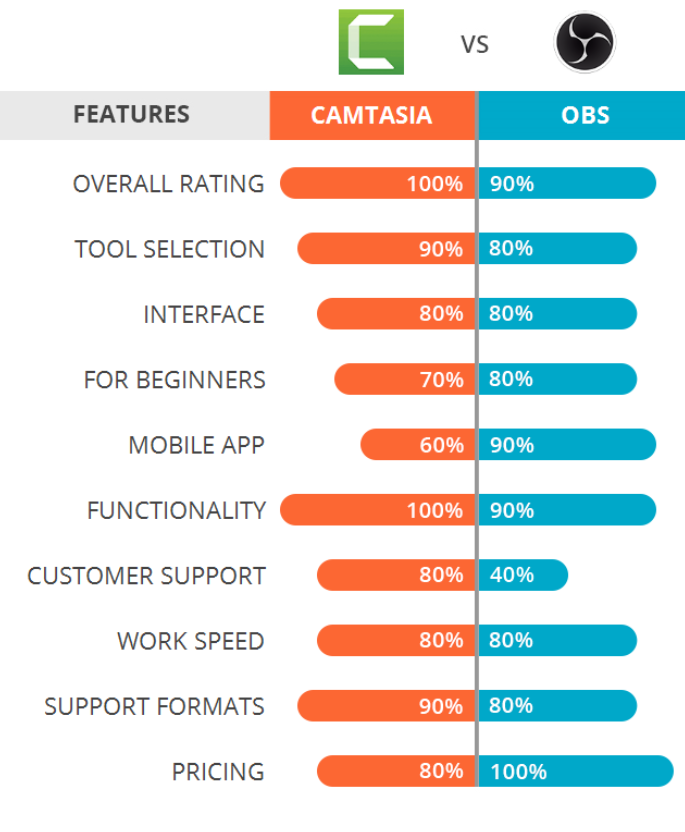
Several third-party options are popular among Mac users for their reliability and feature-rich offerings. Some notable choices include Camtasia, ScreenFlow, and OBS Studio. Research each option to find the one that aligns with your goals.
3. User-Friendly Interface:
Opt for software with an intuitive and user-friendly interface. You want a tool that allows you to focus on your content rather than spending excessive time learning complex features. Look for straightforward controls and a clean design.
4. Editing Capabilities:
If you plan on doing more than basic screen recordings, consider software with robust editing capabilities. Features like adding text, annotations, or transitions can elevate the quality of your recordings.
5. Compatibility:
Ensure that the software you choose is compatible with your Mac’s operating system. Some applications may not support the latest macOS updates, leading to potential compatibility issues.
6. Reviews and Recommendations:
Before making a decision, read reviews and seek recommendations from other Mac users. User testimonials provide valuable insights into the software’s performance, reliability, and any potential drawbacks.
7. Trial Versions:
Many screen recording software options offer trial versions. Take advantage of these trials to explore the interface, features, and overall usability. This hands-on experience will help you make an informed decision.
8. Pricing Structure:
Consider your budget when selecting screen recording software. Some applications offer one-time purchases, while others operate on a subscription basis. Choose a pricing structure that aligns with your financial preferences.
9. Technical Support and Updates:
Opt for software that provides reliable technical support and regular updates. This ensures that any issues are promptly addressed, and the software stays compatible with the latest macOS updates.
Setting Up Your Mac for Screen Recording
Before diving into the world of screen recording, it’s essential to ensure that your Mac is optimized for a smooth and effective recording experience. Follow these steps to set up your Mac for screen recording.
1. Check System Requirements:
Before initiating any screen recording, make sure your Mac meets the system requirements for optimal performance. Ensure that your operating system is up to date, as newer updates often come with improvements to screen recording functionalities.
2. Adjust Display and Resolution Settings:
Access your Mac’s display settings and configure them to match your recording preferences. Consider the resolution you want for your recordings, keeping in mind that higher resolutions may result in larger file sizes.
3. Enable Accessibility Permissions:
Screen recording may require accessibility permissions. Navigate to “System Preferences” > “Security & Privacy” > “Privacy.” Select “Screen Recording” from the left sidebar and ensure the screen recording application (e.g., QuickTime Player or third-party software) is granted permission.
4. Configure Audio Settings:
If your screen recording involves audio, check your Mac’s sound settings. Confirm that the correct input source, whether it’s the built-in microphone or an external one, is selected. Adjust volume levels to ensure clear audio in your recordings.
5. Clean Up Your Desktop:
A cluttered desktop can be distracting in your recordings. Take a moment to organize your desktop, removing any unnecessary icons or files that might detract from the content you’re recording.
6. Close Unnecessary Applications:
To optimize your Mac’s performance during recording, close any applications or processes that are not essential to your recording session. This helps allocate more resources to the screen recording process.
7. Familiarize Yourself with Keyboard Shortcuts:
Learn the keyboard shortcuts associated with your chosen screen recording software. Quick access to start, pause, or stop recordings using keyboard shortcuts can streamline your workflow and improve efficiency.
8. Test Your Setup:
Before diving into a full recording session, conduct a test recording to ensure everything is set up correctly. Check the video and audio quality, making any necessary adjustments to your settings.

Navigating QuickTime Player for Screen Recording
QuickTime Player, a versatile media player on your Mac, doubles as a powerful screen recording tool. Let’s explore how to efficiently navigate QuickTime Player for seamless screen recording.
1. Opening QuickTime Player:
To begin, open QuickTime Player on your Mac. You can find it in the “Applications” folder or use Spotlight Search (Cmd + Space) to locate it quickly.
2. Accessing Screen Recording:
In the menu bar, click on “File” and select “New Screen Recording.” A recording control panel will appear on your screen, allowing you to configure various settings before initiating the recording.
3. Choose Your Recording Area:
QuickTime Player lets you decide whether to record your entire screen or a specific portion. Click the small arrow next to the record button to reveal the recording options. Select “Entire Screen” or “Selected Portion,” depending on your needs.
4. Configuring Audio Settings:
Before starting the recording, configure your audio settings. Click the small arrow next to the record button again, and choose your preferred audio input source. You can select the internal microphone for system audio or an external microphone for voiceovers.
5. Utilize the Recording Control Panel:
During the recording, a small control panel will be visible. This panel includes essential features such as a stop button, audio mute option, and a cancel button. Familiarize yourself with these controls for a smoother recording experience.
6. Starting and Stopping the Recording:
Click the red record button to start capturing your screen. You can pause or stop the recording using the controls in the small panel. When you finish recording, QuickTime Player will automatically open the captured file.
7. Save and Export Your Recording:
Once the recording is complete, go to “File” and select “Save” to store the recording on your Mac. If you want to export the recording in a different format or share it on other platforms, choose the “Export As” option.

Third-Party Software Installation
While QuickTime Player offers basic screen recording capabilities, you might opt for third-party software to access advanced features. Let’s walk through the straightforward process of installing third-party screen recording software on your Mac.
1. Research and Choose Software:
Begin by researching and selecting the third-party screen recording software that aligns with your needs. Choose a reputable option such as Camtasia, ScreenFlow, or OBS Studio based on your preferences for features and ease of use.
2. Download the Software:
Visit the official website of the selected software and locate the download section. Click on the download link to initiate the download process. Ensure you download the version compatible with your Mac’s operating system.
3. Open the Installer:
Once the download is complete, locate the installer file (usually in your Downloads folder) and open it. This action will launch the installation wizard, guiding you through the setup process.
4. Follow Installation Instructions:
The installation wizard will present you with a series of instructions. Follow each step carefully, agreeing to terms and conditions as necessary. Most installations involve dragging the software icon to your Applications folder.
5. Launch the Software:
After successful installation, locate the third-party software in your Applications folder. Double-click on the icon to launch the program. Some software might require additional setup or account creation, so be attentive to any prompts.
6. Explore the Interface:
Familiarize yourself with the software’s interface. Take a few moments to explore the menus, settings, and available features. Understanding the layout will make your screen recording sessions more efficient.
7. Adjust Preferences:
Go to the software’s preferences or settings menu to customize your recording preferences. This may include selecting recording quality, setting hotkeys, or configuring audio sources. Tailoring these settings ensures a recording setup that suits your needs.

Recording Your Screen
Now that you’ve set up your screen recording software, let’s delve into the process of actually capturing your screen. Whether you’re using QuickTime Player or a third-party application, the steps are generally straightforward.
1. Open Your Screen Recording Software:
Launch the screen recording software you’ve installed on your Mac. If you’re using QuickTime Player, go to “File” and select “New Screen Recording.” For third-party software, open the application from your Applications folder.
2. Choose Your Recording Area:
Decide whether you want to record your entire screen or a specific portion. Most screen recording tools allow you to make this selection before starting the recording. Consider your content and choose the option that best suits your needs.
3. Configure Audio Settings:
If your recording involves audio, ensure your microphone or system audio is selected appropriately. Adjust volume levels to achieve a balance between clear narration and any other audio elements you wish to capture.
4. Start the Recording:
Locate the “Record” or “Start Recording” button in your software. Click it to initiate the recording process. If you’re using QuickTime Player, a recording control panel will appear, allowing you to start the recording.
5. Perform Your Actions:
Once the recording begins, perform the actions you want to capture on your screen. Whether it’s a software tutorial, a gameplay session, or a presentation, ensure you act naturally, as all your actions will be recorded.
6. Pause or Stop Recording:
Most screen recording tools provide an option to pause or stop the recording. If you need a break or want to segment your recording, use the pause feature. When you’re finished, click the stop button to end the recording session.
7. Review Your Recording:
After stopping the recording, take a moment to review the captured content. Check for any issues, assess the quality, and ensure that all necessary elements were successfully recorded.
8. Save or Export Your Recording:
Save your recording to your preferred location on your Mac. If you’re using QuickTime Player, it will automatically open the recorded file. For third-party software, follow the specific steps to save or export your recording in the desired format.

Selecting Recording Parameters
Choosing the right recording parameters is crucial to ensure your screen recordings meet your expectations in terms of quality, file size, and overall usability. Let’s explore the key recording parameters you may encounter and how to make informed choices.
1. Frame Rate:
Frame rate refers to the number of individual frames displayed per second in your recording. Common frame rates include 30 frames per second (fps) and 60 fps. Higher frame rates result in smoother motion but may lead to larger file sizes. Consider your content – if it involves fast movements, a higher frame rate may be beneficial.
2. Resolution:
The resolution determines the clarity and sharpness of your recording. Standard resolutions include 720p (1280×720) and 1080p (1920×1080). Higher resolutions offer more detail but can result in larger file sizes. Choose a resolution that suits your needs, balancing clarity with file size constraints.
3. Audio Settings:
When recording audio, consider the source and purpose. If you’re providing narration, ensure your microphone is selected and configured properly. For system audio, choose the appropriate audio source. Adjust volume levels to achieve a balanced and clear audio recording.
4. Recording Length:
Be mindful of the length of your recording. Longer recordings will naturally result in larger file sizes. If you have a specific platform or audience in mind for your content, check any limitations or guidelines regarding video length.
5. Compression Options:
Many screen recording tools offer compression options to reduce file sizes without sacrificing too much quality. Experiment with compression settings to find the right balance between file size and video quality.
6. Aspect Ratio:
The aspect ratio determines the shape of your recording. Common ratios include 16:9 (widescreen) and 4:3 (standard). Choose the aspect ratio that best fits your content or adheres to the requirements of the platform where you plan to share your recording.
Editing and Enhancing Your Screen Recording
Once you’ve captured your screen recording, the next step is to polish it, ensuring it meets your standards and effectively communicates your message. Let’s explore key editing and enhancing techniques to refine your screen recordings.
1. Trimming and Cutting:
Begin by trimming any unnecessary sections from your recording. Most editing software allows you to cut and remove portions easily. Trim the beginning and end to ensure a clean start and finish.
2. Adding Annotations:
Enhance clarity by adding annotations such as text, arrows, or shapes to highlight specific elements on your screen. This is particularly useful for tutorials or presentations where emphasis is crucial.
3. Incorporating Transitions:
Smooth out abrupt transitions between scenes or actions by incorporating transitions. This adds a professional touch to your recording and improves the overall viewing experience.
4. Adjusting Playback Speed:
Control the pacing of your recording by adjusting the playback speed. This is useful for tutorials where you might want to slow down for complex steps or speed up repetitive sections.
5. Including Voiceovers:
If your original recording lacked narration, consider adding a voiceover during the editing process. This is an excellent way to provide context or explanations, enhancing the educational value of your content.
6. Background Music:
Elevate the overall atmosphere of your recording by adding background music. Choose music that complements your content without overpowering it. Be mindful of volume levels to maintain a balanced audio mix.
7. Color Correction:
Ensure consistency in color across your recording by applying basic color correction. Adjust brightness, contrast, and saturation to enhance visual appeal. This step is especially relevant for recordings with varying lighting conditions.
Saving and Exporting Your Recording
Once you’ve fine-tuned your screen recording, it’s time to save or export it in a format suitable for your intended use. Here’s a straightforward guide on how to save and export your recording using popular screen recording software on your Mac.
1. In QuickTime Player:
If you used QuickTime Player for your screen recording, saving is a seamless process. After stopping the recording, QuickTime Player will automatically open the recorded file. Simply go to “File” and select “Save.” Choose your desired location on your Mac, and the recording will be saved in its native format.
2. In Third-Party Software:
For third-party software like Camtasia, ScreenFlow, or OBS Studio, the process may vary slightly, but the general steps are similar:
- After editing your recording, look for an option like “Save” or “Export.”
- Choose the format in which you want to save your recording. Common formats include MP4, MOV, or others, depending on your software.
- Select the destination folder on your Mac where you want to save the recording.
- Confirm any additional settings, such as video quality or compression options.
- Click “Save” or “Export” to initiate the saving/exporting process.
3. Naming Your File:
Before finalizing the saving/exporting process, it’s essential to give your recording a clear and descriptive name. This helps you easily identify the content later and ensures organization if you have multiple recordings.
4. Choose a Suitable Format:
Consider the platform or purpose for which you plan to use the recording when selecting the format. MP4 is widely accepted and compatible with various platforms, making it a popular choice. However, some platforms or devices might have specific format requirements.
5. Review Your Export Settings:
Some software provides advanced export settings that allow you to fine-tune the output. Review these settings to ensure they align with your preferences. This might include adjusting resolution, bitrate, or other parameters.
Troubleshooting Common Issues
Screen recording on your Mac may encounter occasional hiccups, but understanding common issues and their solutions can help you overcome challenges efficiently. Let’s explore troubleshooting tips to address common screen recording issues.
1. Audio Sync Issues:
Problem: Your recorded audio may not sync properly with the corresponding video.
Solution: Adjust the audio synchronization in your recording software. Some applications allow you to manually align the audio with the video timeline.
2. Low Frame Rate or Laggy Playback:
Problem: Your screen recording playback is choppy or has a low frame rate.
Solution: Lower the resolution or frame rate in your recording settings. Additionally, close unnecessary applications running in the background to free up system resources.
3. File Size Too Large:
Problem: Your recorded file size is larger than expected.
Solution: Experiment with compression settings during the export process to reduce file size. Choose a balance that maintains acceptable quality without creating excessively large files.
4. Recording Quality Issues:
Problem: The overall recording quality is not as expected, with visual artifacts or distortion.
Solution: Check your recording settings for resolution, bitrate, and compression. Adjust these parameters to enhance the overall quality of your screen recording.
5. Microphone or Audio Distortion:
Problem: The recorded audio has distortion or unwanted noise.
Solution: Ensure that your microphone is functioning correctly and is free from physical damage. Adjust microphone settings to reduce sensitivity and minimize background noise.
6. Software Crashes During Recording:
Problem: Your screen recording software crashes during the recording process.
Solution: Update your recording software to the latest version, as newer releases often include bug fixes. If the issue persists, consider using an alternative software or reaching out to the software’s support team.
7. Incomplete or Corrupted Recordings:
Problem: Your screen recordings are incomplete or corrupted.
Solution: Ensure that you have sufficient storage space on your Mac. Additionally, monitor your recording software for any error messages or alerts during the recording process.
Advanced Screen Recording Techniques
Once you’ve mastered the basics, it’s time to explore advanced screen recording techniques that can elevate the quality and impact of your recordings. Let’s delve into advanced strategies to enhance your screen recording experience on your Mac.
1. Multi-Display Recording:
Technique: Capture content across multiple displays for a comprehensive recording.
How to: In your screen recording software, look for options to select specific displays or configure a custom recording area spanning multiple screens.
2. Green Screen (Chroma Key) Effects:
Technique: Integrate green screen effects for a professional and polished look.
How to: Use a green screen backdrop during your recording and then apply chroma key effects during the editing process to replace the green background with visuals or videos.
3. Webcam Overlay:
Technique: Enhance engagement by including a webcam overlay in your screen recording.
How to: Enable your webcam during recording and adjust its position in the recording frame. This is useful for tutorials, presentations, or gameplay recordings.
4. Hotkeys for Efficient Control:
Technique: Improve workflow efficiency by utilizing hotkeys for various recording functions.
How to: Familiarize yourself with the hotkeys provided by your recording software. This allows you to start, stop, pause, or perform other functions seamlessly during recording.
5. Simultaneous Audio Sources:
Technique: Record multiple audio sources simultaneously for versatile content.
How to: Configure your recording software to capture both system audio and an external microphone. This is valuable for scenarios where narration and system sounds need to be captured separately.
6. Annotations with Interaction:
Technique: Make your tutorials interactive by adding annotations that respond to user clicks or interactions.
How to: Some advanced screen recording tools enable interactive annotations. Configure these annotations to trigger specific actions based on user input during playback.
Optimizing for Sharing and Uploading
Once you’ve perfected your screen recording, it’s essential to optimize the file for sharing and uploading to various platforms. Follow these steps to ensure your recording maintains quality and is well-received by your audience.
1. Choose the Right Format:
Optimization Tip: Select a universally supported video format such as MP4. This ensures compatibility across various platforms and devices.
How to: During the export or save process in your screen recording software, choose the MP4 format.
2. Compression for Efficient Uploading:
Optimization Tip: Compress your video to reduce file size without compromising quality. This is crucial for quicker upload times and smoother streaming.
How to: Adjust compression settings during the export process, finding a balance between file size and video quality.
3. Resolution Considerations:
Optimization Tip: Tailor the resolution to match the platform or audience preferences. Higher resolutions may be suitable for platforms supporting 1080p or 4K.
How to: Choose the appropriate resolution settings in your recording software based on your target platform or audience.
4. Video Bitrate Adjustment:
Optimization Tip: Optimize video bitrate to achieve a good balance between quality and file size. Higher bitrates generally result in better quality but larger files.
How to: Adjust the video bitrate settings during the export process, experimenting to find the optimal balance.
5. Thumbnails and Descriptive Titles:
Optimization Tip: Create an engaging thumbnail and use a descriptive title. This encourages clicks and helps your audience understand the content.
How to: Design a captivating thumbnail and use clear, descriptive titles when uploading your recording to platforms like YouTube.
6. Uploading During Off-Peak Hours:
Optimization Tip: Choose off-peak hours for uploading to avoid network congestion. This can lead to faster upload speeds and a smoother experience for your audience.
How to: Schedule your uploads during times when internet traffic is typically lower, such as early morning or late evening.
Conclusion
Congratulations! You’ve now acquired the skills and knowledge needed to master screen recording on your Mac. From the basics of setting up your system to exploring advanced techniques, you’re equipped to create engaging and professional-quality content.
Remember, the key to successful screen recording lies in the details. Choosing the right software, optimizing settings, and troubleshooting common issues are integral steps in ensuring a seamless recording process. Whether you’re creating tutorials, gameplay videos, or presentations, these techniques will help you capture and convey your message effectively.
As you embark on your screen recording journey, don’t hesitate to experiment and explore the vast possibilities that your Mac offers. Each recording is an opportunity to refine your skills and enhance the visual appeal of your content. By incorporating advanced techniques, you can add an extra layer of professionalism to your recordings, making them stand out in a crowded digital landscape.
Lastly, don’t underestimate the power of optimization. Selecting the right format, compressing your videos efficiently, and paying attention to details like thumbnails and titles contribute to a polished and shareable final product. Whether you’re uploading to YouTube, sharing on social media, or embedding in a presentation, these optimization tips will ensure your recordings shine on any platform.
Now, armed with this comprehensive guide, go ahead and unleash your creativity through screen recording. Whether you’re a content creator, educator, or business professional, your newfound skills will empower you to share your knowledge, showcase your expertise, and connect with your audience in a meaningful way.
Happy recording, and may your screen captures tell stories that resonate with your viewers!


Pingback: Simplify Your Workflow: Learn How to Edit a PDF on iPhone Easily